Configuring Failover with Pinger on Donyx Routers
| This article applies to dnxOS version 1.1 and later. |
When configuring an industrial router, ensure uninterrupted network connectivity. If the primary connection drops or becomes unstable, the router should switch to a backup channel.
This is done using the Pinger utility, which performs two main functions:
-
Availability monitoring: sends probes to a configured target host (e.g., a public DNS server) using various protocols (ICMP, TCP, HTTP, ARP). This allows it to track the status of critical channels.
-
Dynamic routing management (Failover): when link quality degrades (latency or packet loss thresholds are exceeded), the utility automatically increases the metric of the problematic route and switches to the backup route, which then becomes the preferred one.
Before You Begin
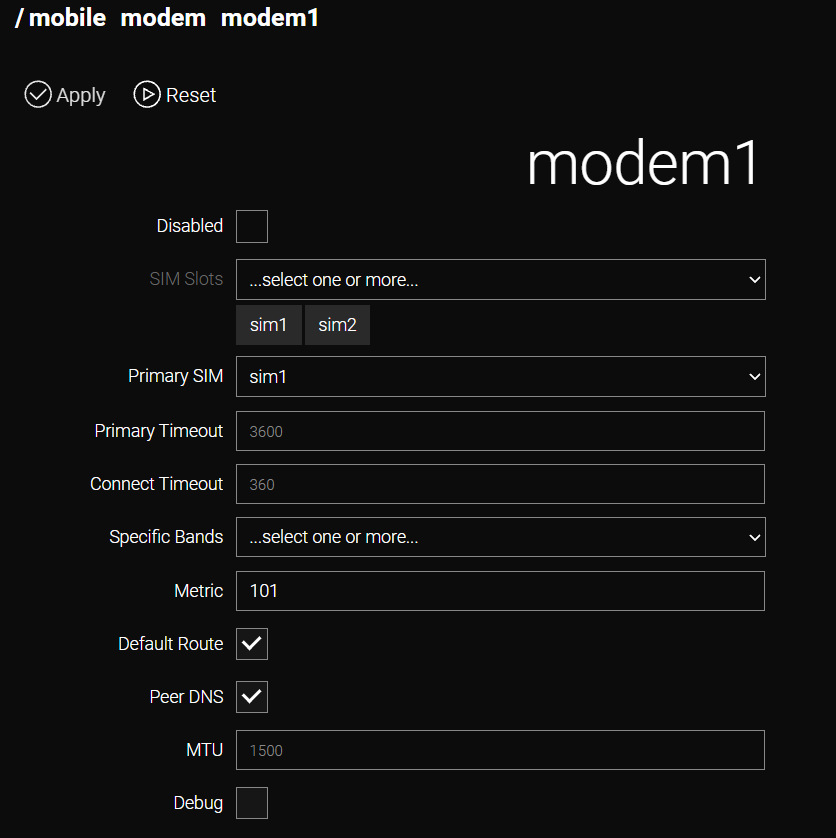
Initial configuration is performed under /mobile → modem.
Field |
Description |
SIM Slots |
Available SIM cards |
Primary SIM |
The primary SIM card, which will have priority for connection (single-module routers only) |
Primary Timeout |
Time in seconds before the modem switches back from the backup SIM to the primary one |
Connect Timeout |
Time in seconds during which the modem attempts to establish a connection using the current SIM card. If the SIM card does not register on the carrier network within this time, the router reboots the cellular module and the connection attempt starts over |
Metric |
A numeric value that determines route priority. The lower the metric value, the more preferred the route. |
Default Route |
Default route |
| Automatic metric changes apply only to interfaces configured as the default route. |
Example: Single-Module Router with Two SIM Cards
A single-module router has two SIM cards with internet access. A wired internet connection (WAN) is not used. Thus, modem1 is the only interface configured as the default route.
The requirement is that when one SIM card loses its connection, the router automatically switches to the other one.
-
Under /mobile → modem, configure the modem1 interface: set the Primary SIM, Primary Timeout, and Connect Timeout parameters.
-
Configure Pinger to check the address 8.8.8.8 (Google public DNS server) via the ICMP protocol to verify internet access on the current SIM card (see the Configuring Pinger Checks section).
How It Works
-
When the cellular module starts up, the Connect Timeout countdown begins (360 seconds in this example). During this time, the modem attempts to establish a connection using the SIM card assigned in Primary SIM.
-
Once the router receives an address from the carrier and the SIM card interface is activated, Pinger checks begin:
-
If the check succeeds, Primary SIM continues to be used for the internet connection and Connect Timeout is disabled.
-
If the checks fail and the number of consecutive failures reaches the value specified in the Retries field, the cellular module is rebooted. It then attempts to establish a connection again within the time specified in Connect Timeout. In this case, establishing a connection means registering on the carrier network and passing the Pinger check successfully.
-
If Primary SIM still fails to establish a connection within the allotted time, the router switches to the second SIM card (a Connect Timeout also starts for it). Once the second SIM card successfully establishes a connection, the Primary Timeout countdown begins, after which the router automatically switches back to Primary SIM.
-
CLI Configuration
/mobile modem modem1
  debug		false
  defaultroute	true
  disabled	false
  metric	101
  modem-connect-timeout	360
  modem-primary-sim		sim1
  modem-primary-sim-timeout	3600
  modem-sim-slot		sim1,sim2
  mtu		1500
  peerdns	true
  apply
Example: Dual-Module Router with Two SIM Cards
-
Under /mobile → modem, configure the two interfaces modem1 and modem2, which are set as default routes. Different metrics must be specified for them:
-
modem1 – Metric 204
-
modem2 – Metric 205
-
-
Configure Pinger separately for each interface to check the address 8.8.8.8 (Google public DNS server) via the ICMP protocol under /service → pinger → modem1 and /service → pinger → modem2 (see the Configuring Pinger Checks section).
How It Works
-
When the cellular modules start up, the Connect Timeout countdown begins (separately for each module). During this time, the router attempts to establish a connection on both SIM cards.
-
Once the SIM cards receive addresses from the carriers and the corresponding SIM interfaces are activated on the router, a separate Pinger check begins on each of them:
-
If the check succeeds, the interface metric is reduced by 100 and Connect Timeout is disabled. In this example, if Pinger checks succeed on both SIM cards, the metrics will become 104 (modem1) and 105 (modem2). The route through modem1 will be considered preferred.
-
If, after a series of successful checks, a failure occurs on one of the SIM cards (e.g., internet access is lost) and the Pinger check fails, the interface metric returns to its original value. The route with the lower metric becomes preferred.
-
If the first check fails, the interface metric does not change.
-
If the number of consecutive failed checks reaches the value specified in the Retries field, the cellular module is rebooted and attempts to reconnect to the network. The module is also rebooted when Connect Timeout expires if the connection has not been established.
-
CLI Configuration
/mobile modem modem1
  debug		false
  defaultroute	true
  disabled	false
  metric	204
  modem-connect-timeout	360
  modem-primary-sim		sim1
  modem-primary-sim-timeout	3600
  modem-sim-slot		sim1,sim2
  mtu		1500
  peerdns	true
  apply
/mobile modem modem2
debug false
defaultroute true
disabled false
metric 205
modem-connect-timeout 360
modem-primary-sim sim1
modem-primary-sim-timeout 3600
modem-sim-slot sim1,sim2
mtu 1500
peerdns true
apply
Example: SIM Card and Wired Connection
-
The router is connected to the internet via a primary channel (modem1 – mobile network) and a backup channel (port1 – wired connection). Both interfaces are set as default routes, and different metrics must be specified for them:
-
modem1 – Metric 101
-
port1 – Metric 100
-
-
Configure Pinger to check the address 8.8.8.8 (Google public DNS server) via the ICMP protocol (see the Configuring Pinger Checks section).
How It Works
-
If the check succeeds, the interface metric is reduced by 100 (if the assigned metric was initially less than 100, nothing happens, but using such a configuration is not recommended). In this example, a successful check will set the metric to 1. The route through modem1 will be considered preferred.
-
If the first check fails, the interface metric does not change.
-
If, after a series of successful checks, a failure occurs on one of the SIM cards (e.g., internet access is lost) and the Pinger check fails, the interface metric returns to its original value and the router switches to the backup channel (its metric must be lower than the metric of the primary channel).
CLI Configuration
/mobile modem modem1
  debug		false
  defaultroute	true
  disabled	false
  metric	101
  modem-connect-timeout	360
  modem-primary-sim		sim1
  modem-primary-sim-timeout	3600
  modem-sim-slot		sim1
  mtu		1500
  peerdns	true
  apply
/ip interface port1
defaultroute true
disabled false
metric 100
peer-dns true
applyConfiguring Pinger Checks
-
Go to /service → pinger and click Add. In the window that appears, select the interface from which checks will be performed; in this example, modem1.

-
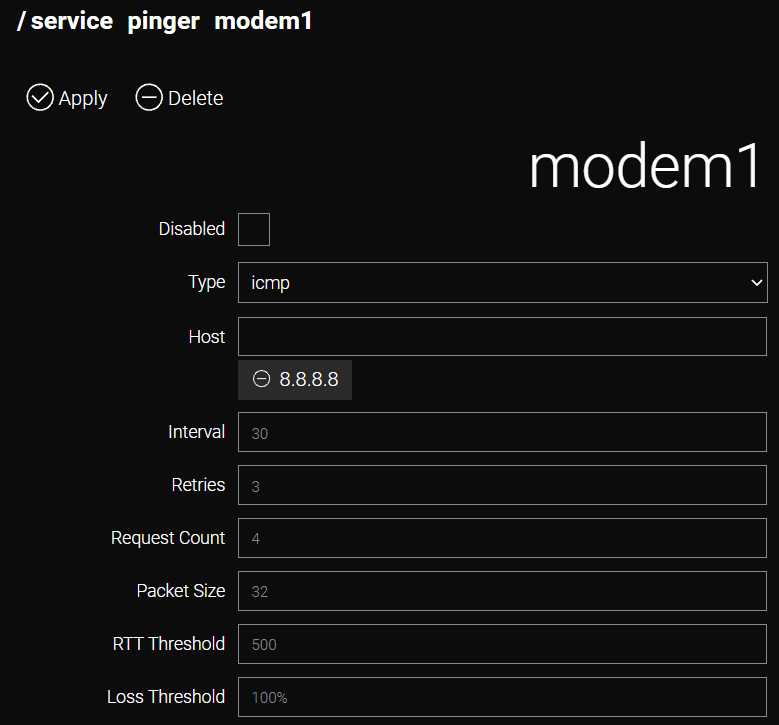
In the form that opens, specify the parameters:
Field |
Description |
Value |
Type |
Check type: icmp – standard ICMP echo requests (ping). A universal method for checking host availability on a network; |
icmp |
Host |
List of addresses to check, in IP address or domain name format (for a tcp check, the port number must also be specified after a colon) |
8.8.8.8 |
Interval |
Interval between checks in seconds |
default |
Retries |
Number of failed checks after which the utility restarts the interface to which Pinger is bound |
default |
Request Count |
Number of packets sent within a single check attempt |
default |
Packet Size |
Size of the check packet in bytes |
default |
RTT Threshold |
Round-trip time threshold, exceeding which is considered a failure. Maximum allowable latency value in milliseconds |
default |
Loss Threshold |
Number of lost packets, exceeding which is considered a failure, in percent |
default |
|
For a tcp check to work, a server for the Pinger utility must be installed on the remote host. Installation instructions are available at the link. RTT (Round-Trip Time) is the time it takes for a data packet to travel from the source to the destination and back. |
-
To apply the settings and start Pinger, click Apply.
-
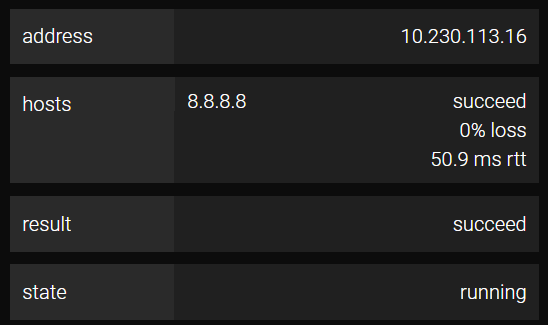
A Result – Succeed status on the statistics panel means that the check was successful.
CLI Configuration
/service pinger add interface=modem1
  count		4
  disabled	false
  host		8.8.8.8
  interval	30
  retries	3
  rtt-threshold		500
  size		32
  type		icmp
apply| For a dual-module router, the same settings are configured for modem2. |
| All modifications are permanently saved to the router configuration only after executing the /system config commit command or clicking the commit button in the web interface. |