TLS Certificate Generation for OpenVPN on Donyx Routers
Routers running dnxOS feature integrated tools for generating, importing, and exporting TLS certificates, which are utilized to secure tunneling protocols such as OpenVPN.
Specifically, implementing TLS for OpenVPN requires the creation of a local Certification Authority (CA), a server certificate, and one or more client certificates for the devices connecting to the router acting as the server.
TLS Certificate Generation Instructions
-
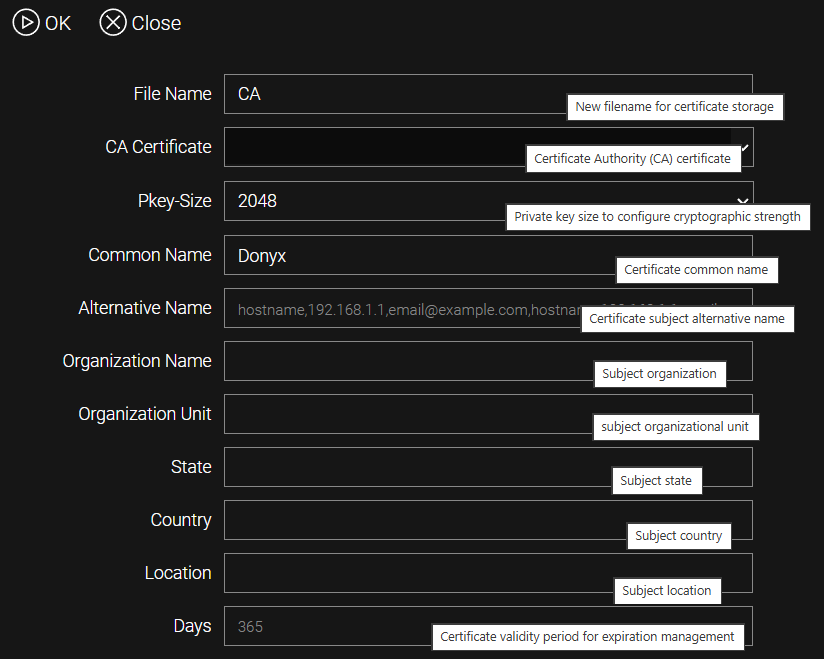
Navigate to the /storage/certificate section and click Cert Create.
-
Complete the displayed form with the following parameters:
-
File Name — The internal identifier for the certificate file.
-
Common Name — The name of the new CA (e.g., Donyx).
-
CA Certificate — Leave blank for the CA creation.
-
Pkey-Size — The encryption key size (default: 2048 bits).
Optional fields may be completed as needed.
Click OK. After a brief period, the new certificate will be displayed in the certificate list.
-
CLI Configurations
/storage certificate cert-create name=CA pkey-size=2048 cn=Donyx-
To create the server certificate, click Cert Create again and configure the following settings:
-
File Name — The certificate filename (e.g., server).
-
CA Certificate — Select the CA created in the previous step.
-
Common Name — The common name (CN) for the certificate. This typically represents the name of the router where the certificate will be installed. In this example, server is used.
Click OK.
-
CLI Configuration
/storage certificate cert-create name=server ca=CA pkey-size=2048 cn=server-
To create the client certificate, click Cert Create and configure the following settings:
-
File Name — The certificate filename (e.g., client).
-
CA Certificate — Select the previously created CA.
-
Common Name — An identification string, name, or other identifier. In this example, client is used.
Click OK.
-
CLI Configuration
/storage certificate cert-create name=client ca=CA pkey-size=2048 cn=clientThe certificates have been generated. To use them on a different device, specific files must be exported.
| All modifications are permanently saved to the router configuration only after executing the /system config commit command or clicking the commit button in the web interface. |
Export
-
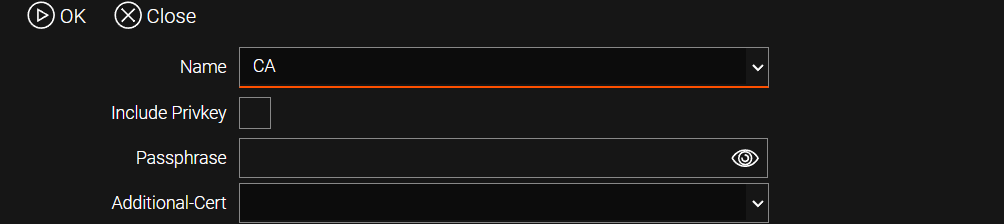
Click Cert Export. To export the public CA certificate, select the assigned CA name in the Name field (in this example, CA). Click OK.
CLI Configuration
/storage certificate cert-export name=CA-
Navigate to the /storage/file section, where the CA.pfx file is now located. Click the file and select Download.
-
Export the client certificate:
-
Return to the /storage/certificate section and click Cert Export.
-
Select the client certificate from the Name list, enable the Include Privkey option, and specify a password of at least 8 characters in the Passphrase field. Click OK.
-
CLI Configuration
/storage certificate cert-export name=client include-pkey=true passphrase=password| The value password is provided as an example passphrase. A minimum length of 8 characters is required for all passphrases. |
-
Download the client.pfx file from the /storage/file section.
Files can also be downloaded using a command-line client. For example, in Linux, use the scp utility to download to the current directory:
CLI Configuration
scp admin@ROUTER_IP:CA.pfx ./
scp admin@ROUTER_IP:client.pfx ./
Import
-
Perform the certificate import on the second router. Navigate to the /storage/file section.
-
Click Upload, then Choose, and select the previously saved CA.pfx and client.pfx files.
-
Click Upload again. Once uploaded, the files will appear in the list with the type temporary.
Files can also be uploaded using a command-line client. For example, in Linux, use the scp utility:
CLI Configuration
scp CA.pfx admin@ROUTER_IP:CA.pfx
scp client.pfx admin@ROUTER_IP:client.pfx-
Navigate to the /storage/certificate section and click Cert Import.
-
In the Name list, select CA.pfx and click OK.
CLI Configuration
/storage certificate cert-import name=CA.pfx-
Click Cert Import.
-
In the Name list, select client.pfx and enter the passphrase specified during the export process.
-
Click OK. After a short period, the certificate will be displayed in the /storage/certificate section.
CLI Configuration
/storage certificate cert-import name=client.pfx passpharase=password| All modifications are permanently saved to the router configuration only after executing the /system config commit command or clicking the commit button in the web interface. |
TLS Auth Key (ta.key)
If a TLS Auth Key (ta.key) is utilized on the OpenVPN server, it must also be uploaded and imported into the system.
The upload and import process can be performed using the following methods:
Web Interface:
In the /storage/file section, select the ta.key file and click the Import button.
SCP:
scp ta.key admin@ROUTER_IP:ta.keyCLI:
/storage file ta.key importThe ta.key file will then be available for selection in the OpenVPN server configuration.